This Valentine’s Day, show your barn buddies that they are the frosting to your cupcake with this amazing horse cupcake cake. You’ll be the hit of the stables when you walk up with your masterpiece. It’s easy to make, yet super impressive. Let’s get baking!
Materials
◆ 38 cupcakes (about 2 boxes of cake mix)
◆ 4-5 tubs of frosting
◆ Colored cupcake liners
◆ Decorative sprinkles & pearls (optional)
◆ Food coloring
◆ Pastry bags or plastic bags Decorating tips and couplers
Step 1: Bake your cupcakes. You can use any flavor you want. We used half vanilla and half chocolate and put them in colorful liners to match the frosting that would be going on top. This isn’t necessary but adds a fun touch!
Step 2: Let your cupcakes cool completely before frosting.=
Step 3: Color your frosting. You can make your own frosting, but we just used store-bought tubs of frost-ing and colored them with food coloring. For example, you can add green food coloring to white or vanilla buttercream or cream cheese frosting for the grass. You can also add white food coloring to chocolate frosting to make a lighter brown for the horse’s body. All food coloring can be found at your local craft or grocery store.
Step 4: It’s time to get ready to decorate! These cupcakes have piped frosting, and just because it looks fancy doesn’t mean it’s hard. Let’s break it down:
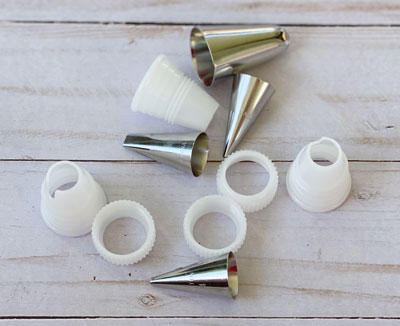
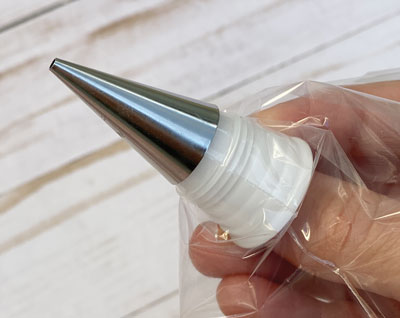
◆ Cut a small hole in the bottom of a pastry bag (or use a plastic bag).
◆ Insert the base in the bag.
◆ Place the tip on the outside of the bag and screw the other piece of the coupler in place (if you don’t have a cou-pler, you can still make this work
by inserting your tip into a bag and using a little tape to secure it on the outside).
◆ Fill your bag with frosting and you are ready to go!
Step 5: When decorating the cup-cakes, you can use any design or tip you want. These cupcakes were frosted using a 2D drop flower tip. Starting on the outside, make a large circle of frosting and continue toward the center of your cupcake until it’s filled with frosting. Squeeze one last time in the center and then stop squeezing and lift up the icing bag. Continue until you have decorated all of your cupcakes.
Step 6: If you want to add flowers to your grass cupcakes, use the same 2D tip and squeeze a little frosting in one place without moving your hand. Place a pearl in the center.
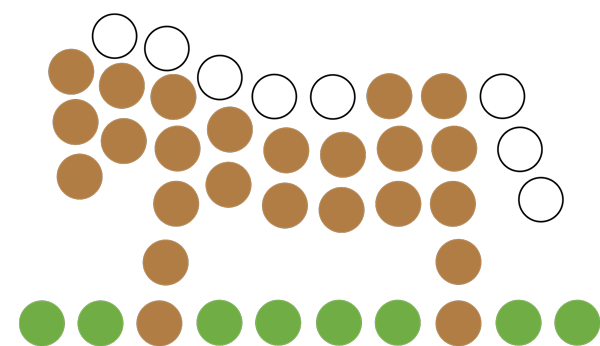
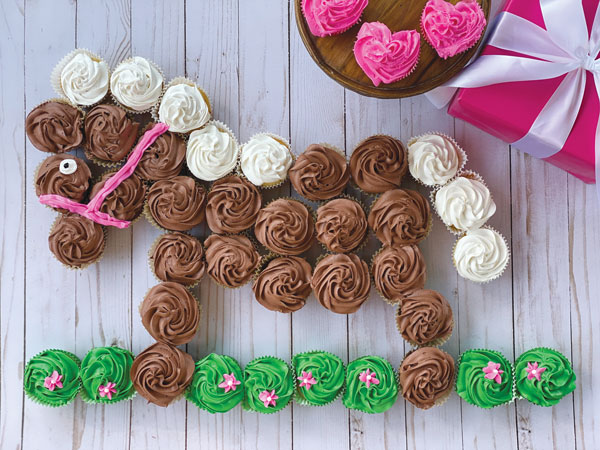
Step 7: It’s time to assemble! Following the diagram, assemble your cupcakes to form the shape of a horse.
Step 8: Once assembled, you can add details with frosting, like an eye and halter. Your cupcakes are now picture perfect and ready to enjoy. Happy Valentine’s Day!
Heart-Shaped Cupcakes
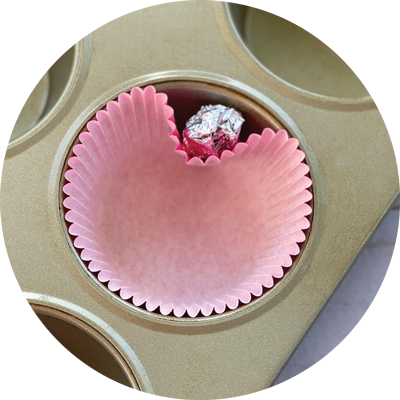
If you have leftover cake batter, you can make heart-shaped cupcakes to get into the Valentine’s Day spirit! Before you fill your cupcake liners, place a marble between the pan and the liner to create a heart shape. Don’t have marbles? Don’t worry! We used foil to create a little ball, and it worked perfectly. Bake as directed, and when you frost your cupcake, make sure to add a tip at the bottom
with frosting to complete your heart shape.
This article on making a horse cupcake cake appeared in the January/February 2020 issue of Young Rider magazine. Click here to subscribe!